Showing posts with label Application. Show all posts

Sunday, 20 May 2012

Make Up Tip No.4 - How to apply Mascara

Applying mascara doesnt have to be as tricky as it may seem, so here are a few tips to help you make the most of those beautiful lashes.

Make-up does go off, all products have an expiration period and you should be aware of this if you are keen to keep a healthy make-up bag, for more information on this, read about it here.

The average expiration period for mascara is 3 months, this is because the tube of the mascara acts as a breeding ground for bacteria.  You see we all have very tiny bacteria on our lashes and as you use your mascara it takes off some of this bacteria and distributes it into your mascara tube.  Now although this sounds gross, it is purely natural and nothing to worry about.  But the build up of bacteria in the mascara tube is exactly why you shouldn't keep your mascara for too long.  In addition to this, don't pump the mascara wand into the tube as this brings air into the tube and allows the bacteria to grow faster.

Image courtesy of www.bestbeauty-tips.com

Now enough of the technicalities, this tip is to help you apply mascara. When starting a new mascara you may find the wand holds a lot of excess product, to remove this simply scrape the wand across the opening of the tube as this allows the mascara to be kept for later applications and not wasted.

Once you have the right amount of product on the wand, you should rest the brush at the base of your lashes, it is best to start with your top lashes as these will need the most product on them.  Personally I find it easiest to have my eyes half open and looking down slightly as this will allow you to apply the product with minimal risk of it transferring onto your eyelid. Once you have positioned the mascara brush at the base of your lashes, gently wiggle the brush from side to side in a zig-zag motion moving away from your eye so you are applying the product to the full length of the lashes.  Once you have done this once, move along the lash line and start again.  Repeat this action until your lashes are completely coated in mascara, you may like to apply more than one coat depending on the look you are going for.

If you find your lashes are looking a bit clumpy, try using a clean mascara wand to comb through the lashes to separate as required.

I hope this is helpful and that you enjoy reading my tips as much as I enjoy writing them!

Saturday, 14 April 2012

Make Up Tip No.3 - How to choose and apply the right concealer

Do you ever look at yourself in the mirror and think, where on earth did those bags come from? I know I do!

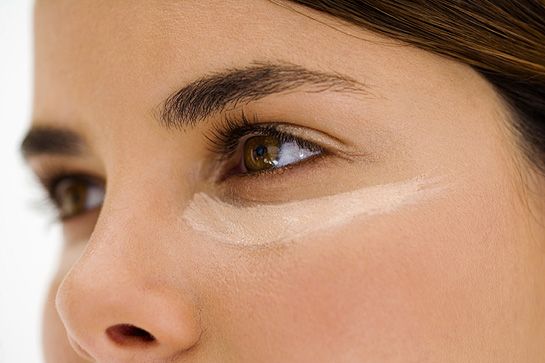
Whether it was a heavy night, not enough sleep or just natural shadows we all have those off days when our under eye shadows can really get us down. So rather than skulking back under the duvet, be proud of your skin and use some concealer to hide those under eye circles.

Image courtesy of http://www.hellomagazine.com

To begin with, don't get confused between colour correctors and concealers. Colour correcting products should be used to even out skin undertones and wont help to conceal blemishes and under eye circles.

When choosing your concealer, pick a colour that is closest to your foundation colour and skin tone.  The colour should exactly match your skin to give a flawless look. You should also consider the consistency when picking your concealer products, to cover blemishes opt for a creamier consistency whereas a more fluid formula is better for covering under eye circles.

To apply, use your ring finger (as it applies less pressure) and dab small dots of concealer along the under eye area and then gently press into the skin.  The skin around your eyes is so delicate you should not rub this area.

Apply concealer before your foundation, then apply foundation in the normal manner.  If required add a touch more concealer on top and then dust with translucent powder to set.

Happy Concealing my lovelies!!


Thursday, 5 April 2012

Make Up Tip No.2 - How to choose the perfect foundation

Choosing the right shade of foundation is a very crucial part of your make up routine and it’s one that you can easily get very wrong - Which is why there are so many Oompa Loompa’s walking around nowadays (you all know exactly who I mean!)

Foundation should never be used to add a tan to your skin, but should be used to create a flawless base for the rest of your make up. Think of yourself as an artist and where you have to prepare your canvas before applying the paints.

The shade of foundation you choose should perfectly match your skin tone (not darker or lighter) an the tip to find this is to lightly apply the foundation along your jawline and see if it disappears when you blend it. You use the jawline because it is an area on your face that is least touched by blemishes. Now I know this may make you look a tad silly when you’re standing in the aisle of Boots but trust me it’s worth it when you can walk around with perfect looking skin.

It is also important to check the colour in natural light rather than artificial to make sure the colour is right for you!

Tuesday, 27 March 2012

Make Up Tip No.1 - For Longer Lasting foundation


image
A tip for longer lasting foundation:

We all want our foundation to last for the whole day, but it seems to slide off throughout the day.  It’s always good to moisturise before applying your foundation, but make sure you don’t apply too much.  In addition to this, try and leave your moisturiser for approximately half an hour before applying your foundation so that it has been absorbed into your skin and this will help your foundation to glide on smoother and last for longer.

Wednesday, 21 March 2012

Product Review: Maybelline Eye Studio Lasting Drama Gel Liner


Maybelline Gel liner application


Maybelline Eye Studio Lasting Drama Gel Liner

I hadn't heard anything about this product, no massive adverts on TV with the latest Supermodel/Superstar, but I came across it during my weekly peruse of the Boots.com website and the latest items section.
I have to say I was curious, so I popped into my local Boots and picked up one of these baby's for £7.99 and it was definitely worth the money!

If you ever have problems trying to draw your eye liner close enough to your lashes to make it look seductive and sexy, but in reality you end up 3mm away and leaving a white line inbetween then this is a 'must have' for you.  The brush allows you to apply the liner directly to the lash line, pushing the colour into the roots and by using gentle strokes you can get a nice smooth line across the length of the lash line.

Because of the consistency of the liner, it is easy to apply and depending on how much you pile onto the brush will determine how the liner will go on. Make sure you keep the brush fresh and clean and you will get a smooth line every time.

Although the pot looks quite small, there is a lot of product in there and you don't need to use very much when you're applying it so I think it will last a long time.

I think this is a great product, and once it has dried, the gel liner is smudge proof and lasts all day!

Maybelline gel liner 1

Maybelline Gel liner 2
Related Posts Plugin for WordPress, Blogger...