Showing posts with label Make-up Tips. Show all posts

Thursday, 22 November 2012

My winter skin care survival tips

Brrrr, it's getting cold in here!

As the cold weather sets in and winter is upon us, it's time to start thinking about your skincare routine and what you may need to do to tweak it for the colder season.

The best way to start this is to think 'emollient and hydrating'. Without us even realising it, our skin can be affected by the weather and changes in temperature. Do you ever find you have random dryness after being in a room with really strong air conditioning? Or do you feel a bit oilier than normal when you're somewhere hot and humid? This is our skins way of coping with the environmental changes that surround us.

To help keep your skin in top condition through the winter months, here are some tips that can help,

  • Opt for a creamy cleanser - swap out your normal cleanser for a creamier formula in the winter, or try using a light, creamy cleanser in the morning and your normal cleanser at night as this will help retain the skins protective oils.


  • Try a rose water skin fresher or toner - avoiding alcohol in products is your best bet this time of year as the alcohol will dry out your skin.
  • If you have normal to dry skin, opt for an oil based moisturiser to keep your skin full of moisture.
  • If you have oily skin, stick to a lighter formula of moisturiser but make sure you are still getting the hydration you need.
  • Keep your skin soft and smooth by using eucalyptus and jojoba oils in the bath - many products on the market contain these oils, pour them into the bath, sit back, relax and enjoy a soak.
  • Use a hydrating face mask once a week to put moisture back into your skin.
  • Apply hand and body lotion twice a day to keep your skin fresh and moisturised.
Have a warm and safe winter, dont forget to wrap up!

Tuesday, 13 November 2012

My 3 Steps for bigger looking eyes

Hello my lovelies,

I thought I would share some of my tips to help make your eyes look bigger,


  • Use an eyeliner to darken the lashline, whether its pencil, gel or liquid liner.  This will emphasise the shape of your eye and will make it look bigger.


  • Apply a nude or champagne coloured eyeliner to line your waterline.  This will open up the eyes making them look more open and wide (and more awake).  Choosing a nude colour is less harsh than white and will look more natural.
  • Make sure you curl your lashes! This will open up your eyes making them look bigger.


Give these steps a try and see your eyes look bigger and even more gorgeous than before!

Friday, 5 October 2012

Quick Tip: My 4 Multitaskers

Hello my lovely people,

I hope you are having a lovely day! I am so excited about all you new followers to my blog, and I would like to take this opportunity to say hello and thank you for your support! I really appreciate all of you and would like to say feel free to contact me at anytime!

So, onto my thoughts for today, did you know that you don't always need a separate product for everything? 
Well its true!  So I thought I would share with you a few tips I have learnt about multitasking products.

1. Concealer

Not only does it hide dark circles and imperfections, you can also use it as an eyelid or lip primer. Apply a small amount with your fingers and it will neutralise the base colour, help the colours you apply to pop and will help your products last!

2. Cream Blusher

I would have to say this product is the ultimate multitasker. You can use it as a highlighter (depending on the colour), lipstick, eyeshadow.... oh and yes, as a blusher!

3. Brown Mascara

Not only can this product be used as a lovely natural daytime mascara, but brush a bit through your eyebrows and you can add definition and shape in a flash.  Just please don't try this with black mascara, or you'll end up with slug brows.

4. Clear Lip balm

Not only can it heal your lips and give you a sexy pout, but add a touch of balm to the tops of your cheeks and you have a quick and easy highlighter!

Now we all know that Men are no good at multitasking, but us women are great at it! So have a rummage through your make-up bags and see how many uses you can find with your products!!

Are there any other multitasking products you use that I haven't thought of?

xxxx

Tuesday, 11 September 2012

My Night Out Survival items!

So when I'm getting ready for a night out, I like to plan ahead and make sure I am prepared for everything! So I thought I would share my handbag essentials for a night out.


Lip Balm – there is nothing worse on a night out than feeling your lips starting to become dry and cracked, keeping a glossy lip balm in your bag will mean you can keep your pout looking delicious without having to worry about using a mirror. At the moment I am loving the Balmi lip balm, to see click here

Blotting paper – This is a top priority item for those of you with oily skin! After you have spent so long applying and setting your make-up before you go out, there is nothing worse than popping to the bathroom and noticing your face is starting to get all shiny. If this happens, pull out a trusty blotting paper and dab lightly onto your skin in the areas you are looking shiny.  The papers will absorb the oil on your skin and will leave a light powder to help keep you matte for the rest of the evening.  Even if you don’t have oily skin these are handy things to have to keep your make-up looking fresh all night long. 

Pocket Mirror – An essential item for your handbag, that way you can always take a sneaky peek to make sure all is still in place. MAC do a really nice slim mirror here or you can get some nice funky ones here


Party Feet – If you are going to be wearing high heels, Party Feet are a must! Although I find they help, they are not miracle workers as my feet still hurt after standing or dancing for a few hours.  My other suggestion is to take a larger handbag with you and stick a pair of pumps in there for when you really can’t stand it any more! To see what types of party feet you can get, click here

Mints or Chewing Gum – I find there is nothing worse than chatting to someone on a night out (and of course you have to get up close if there’s loud music playing) and they have bad breath! Even worse is the feeling that you have bad breath yourself. So to avoid the embarrassment, keep a packet of mints of chewing gum in your bag to ensure you always stay minty fresh.

Hair Grips – Always handy to keep in your bag/purse, to keep those flyaway strands at bay.

Safety pins – Just because you never know what’s going to happen!  I’ve been out before and my bra strap snapped!! I wish I had some of these baby’s on hand when that happened!!

Clear Nail Varnish - If you are like me and don’t feel complete without a pair of tights on, then keeping a handy bottle of clear nail varnish in your bag is useful for when you get a ladder in your tights.  Just pull the material together and apply the varnish for a quick fix.  Alternatively, you can take a spare of tights with you.

These may seem like a lot of things to carry around with you, and they probably wont fit into a little clutch bag but if you’re like me, make these a staple of your ‘Going out’ kit so you are prepared for any eventuality! 

Be prepared and have a great night out!!


Friday, 13 July 2012

My 6 Steps to Summer Make-up

Oh Summer...


As the seasons begin to change and the sun starts to peek out from behind the clouds, you know its time to start planning your spring clean.  Pack away those woolly jumpers and thick boots and start preparing your sandals and summer dresses for summer 2012!

While daydreaming about your outfits for the beach, take a moment to think about your summer beauty style....

1. Act now to protect yourself

You should be using products that contain an SPF all year round, but if you aren’t it is important you start for the summer months. We spend more time outside enjoying the good weather now than we do during the winter (obvious I know) so it is crucial to protect your skin from the harmful UVA and UVB rays.

You can find many moisturisers or foundations on the market that contain an SPF, which helps you stay protected with minimal fuss.

2. Reveal all or cover up... that is the question?

In the warm(ish) summer months you might find that your normal concealer and foundation combo feels a bit heavy on your skin.  If this is the case, there are some alternative options you can try.

For a barely there, natural finish, try a tinted moisturiser or BB cream as these have a lighter consistency and coverage.  They apply just a touch of colour mixed in with a moisturiser to help keep your skin fresh and light.

If you find you need more coverage, opt for a mineral powder foundation.  Once applied, a good mineral powder will warm with your skin and may slightly change colour as it warms.  This warming action will help the coverage look and feel more natural.

3. Glow Under the Sun

For a dewy natural glow, opt for a foundation that has light reflecting particles or states it has a luminous finish.  This helps to give your skin a younger, fresher look, although this may not work well for those with oilier skins.

For an additional glow, opt for a bronzer with a slight shimmer.  The trick to applying bronzer is to apply sparingly and build the colour rather than apply it all at once.  Apply bronzer just under the cheekbones for a sculpted look.  You can also apply to the temples and top of the forehead to add that sunkissed glow.

Using a highlighter can also help to add a glow to your skin all year round.  The trick is to apply a little to each part of the face that is hit by the sun. So apply to the tops of your cheeks, along your brow bone, along the bridge of your nose and forehead if required

4. Splash of Colour

Now that we're leaving the cold winter months behind us its time to lighten up all round! So ditch the dark eyeshadows and try opting for lighter shades.  Not only will you look brighter and fresher but you will feel it too! Opt for pinks, peaches, lilacs and oranges as this will really brighten up your make-up palette and spring you into the summer.

This goes for your lips too, try keeping the colours light and bright to give you a burst of colour that will go well with natural eyes.


5. Smouldering Definition

We all love eyeliner and long lashes, but this can really weigh you down when you're out and about in the sun, so try opting for more natural definition. Try a brown mascara for during the day to give your lashes a more natural definition. This also goes for your brows, try using a clear brow gel to sweep through the shape rather than using a heavier product that could start to feel uncomfortable as you get hot throughout the day.

When it comes to eyeliner, you can still add definition, but lighten up! Try using a colour eyeliner or even use an eyeshadow to line your lids and give that pop of colour.

Oh and when you know it's going to be a very hot day, try opting for a waterproof mascara to avoid any panda eye disasters!


6. Get the gloss

As we brighten up on colours, try it with textures too! A dash of gloss on the lips is quick and easy to apply and will help brighten up your look. Be aware gloss wont last all day, especially if you are eating and drinking, but its worth it for the shine!


Once you have put all of these tips together (or pick and choose what suits you) then you are ready for summer! So throw your sunnies on and get out in the sun!!

Thanks for reading!


Tuesday, 12 June 2012

Make Up Tip No.6 - How to make sure your lipstick stays put

Red, Red Lips


To help your lipstick last for as long as possible, follow my quick steps:

  1. Use a lip liner to line your lips. Choose one that matches the skin colour of your lips.
  2. Fill your lips in using the lip liner.
  3. Apply lipstick to your lips
  4. Blot your lips with a tissue and reapply the lipstick.
  5. Repeat this blotting and re-applying action twice more.
Following these steps will help your lips stay full of colour for longer!

Thursday, 31 May 2012

Beauty Tips for Brides


Your wedding day will be a magical and wonderful time that you will remember for the rest of your life, but with so much going on and so much to do it can be a very stressful time.  With the right planning, your make-up look can be one of the easy tasks to cross off your To-Do list.  Whether you are planning to apply your make-up yourself or hire a professional Make-up artist for your big day, here are a few things you should keep in mind.  


 Make-up is used to enhance natural beauty and build confidence, when used in the right way it can leave you feeling exhilarated and ready to take on the world.  This doesn’t mean you need to plaster layer upon layer on your face and end up looking like a clown, it just means you will need to plan ahead and choose a look that best suits you, your skin and your personality.  If you don’t normally wear make-up then you shouldn’t feel you have to walk down the aisle with a fully made up face, using a small amount of product in the right areas will help you look and feel your best all day.  Just remember, it’s your day, your wedding and as you walk down the aisle you want to look and feel like you, but the best you possible.

You should try and test your make-up looks a few times before the big day; this will give you enough time to change anything you aren’t sure about before the last minute.  It also allows you to choose the right shades and colours rather than making the wrong choice on the morning of your wedding.  It is also useful to take photographs of your look each time you test it, this will help you see what it will look like. 

While you are thinking about your wedding preparations, you also need to think about your skin.  If you are one of the very few lucky women in the world that can use soap and water and wake up every morning with perfect skin then you won’t have a problem on your big day.  But if like the rest of us you are prone to breakouts, have oily or dry patches then you need to take your skin into account in the preparation for your wedding.  A good skincare routine can help to balance out any problem areas you are having and can add to a stress free make-up application.  Any new skin care routine should be started at least 3-4 months before your wedding day; this will help ensure your skin is used to all products and reduces the risk of irritation.
When planning your make-up look you will need to tailor the look and the colouring not only to yourself, but to the time of day of your wedding ceremony.  For a day time wedding, your make up should be kept more natural whereas you can use a more dramatic look for an evening ceremony.

 For a day wedding look, keep the make-up light and natural both on the eyes and the lips.  This type of ceremony is not a great choice for those prone to breakouts as you will want to wear less foundation and concealer.  Because of the natural, soft light that is visible during the day you need to make sure you do not over do the make-up application as you don’t want your finished look to seem cakey.  Heavy powder will also look artificial under morning light, so make sure you dust powder on lightly to retain a matte, yet natural appearance.  The natural daylight will accentuate any colours on the skin, so try to wear less eye shadow and stick to warm, softer shades that compliment your eye colour and blend, blend, blend!  The light will not only show harsh colours, but will also enhance any areas that have not been blended properly.  As the day passes, the light will get stronger and will make lines more visible so you can never blend too much. 
Refrain from using bright, bold colours at any time of day, ignore what the latest fashion style of make-up is and go with what suits your face and your natural features.  Keeping to a ‘classic’ look will ensure you will still be happy to get your wedding photos out to show guests in years to come. 

For evening weddings, you can allow for a more glamorous and dramatic look, this is the best time of day for a ceremony for people that don’t have perfect skin as you can get away with wearing more make-up and still looks natural.   Although an evening ceremony will give you a bit more freedom on colour, you should still try to stick to neutral shades and just add a bit of intensity, this will mean you can still look glamorous without adding lots of colour to your look.  Remember, your photographs will be taken with a flash in the evening, so make sure you try this out in your tests as the colours will show up completely different in the photographs.  Sculpting the face for an evening look is very important; it will add colour and dimension to the face as the camera flash will flatten the look of the face, adding a bronzer will also give the skin a magical glow. 


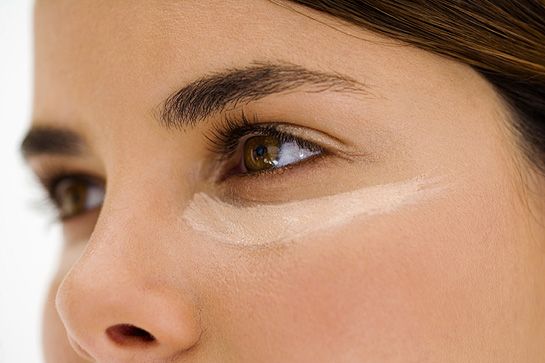
You will need to make sure your eyes are defined for your wedding day look, it may be harder to do this for a day look but you will need to use softer colours and lighter lines to do this.  For an evening look, you can use more definition but please do not think this just means darker.  Sharper, smoother lines and shapes will help 
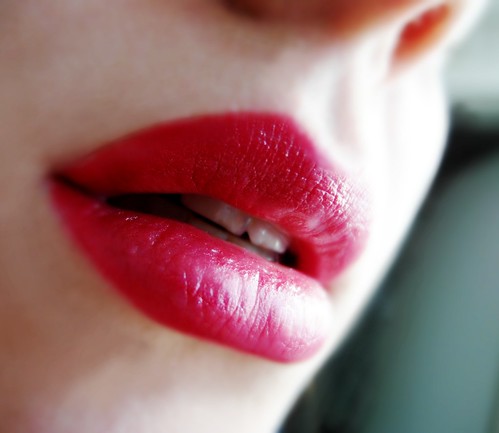
add definition from your eyes to your lips and cheekbones.  You will also be able to use richer lip colours as they won’t show up too intense in the photographs.

I know I have mentioned a lot more about the light and photo’s than I have the style of dress or the colour of the flowers etc.  If you stick to a ‘classic’ timeless look and use soft, warm colours then you can’t really go wrong.  But if you choose bright, daring colours or pile on the products for a natural morning wedding or stick with a natural look for an evening wedding, then I know you will regret it when you get the photographs back. 

In addition to this, here are a few more quick tips:
ü  Always wear waterproof mascara, as you don’t want to worry about getting panda eyes while being emotional on your big day.
ü  False eyelashes are a great way to add definition to your eyes and are a must for an evening wedding. 
ü  Individual lashes are a great way to add thickness to naturally sparse lashes.  If you do not want to use lashes, apply layers of mascara for as much definition as possible.
ü  Do define the eyes well at the lash line to help them stand out.
ü  Matte foundations are best for all photographs, as they reduce shine. 
ü  Do test all products in your trials before the wedding to make sure they do not react or irritate your skin.
ü  In the final build up to your big day, sleep on a fresh clean pillow case each night to reduce the risk of break outs.
ü  Drink plenty of water as you will be amazed at what it will do for your skin.
ü  Take photos of your make-up look in each trial or experiment.
ü  
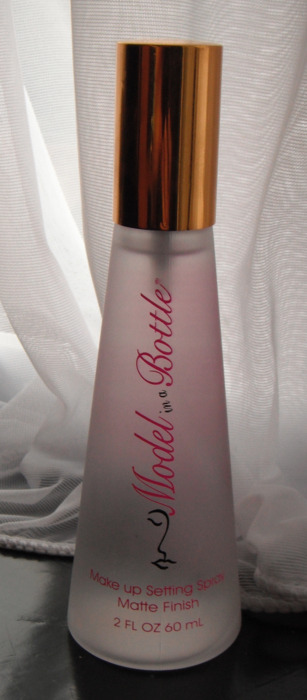
Use a setting agent like ‘Model in a Bottle’ a quick spray of this on top of your finished look will help it last all day long.
û  For afternoon weddings, do not wear foundation that has a sheen or dewiness to it, this is the harshest light to get married in because the sunlight is directly above you.  Any sort of sheen will make you look shiny in photos.
û  Do not leave your make-up plans until the last minute, you need to experiment and find out what suits you.
û  Do not plaster your face with products, you will look cakey, the right products will work for you in the right amount.

Finally, be sure to remember your wedding day should be enjoyable for you, so enjoy your make-up, smile and have a wonderful, magical day!


Monday, 28 May 2012

8 Steps on how to make sure you're foundation lasts all day!

If you're like me and don't have much time during the day for touch ups to your make-up, then you want to trust that once you apply your foundation in the morning it will last all day with the smallest amount of interference.  So here are my quick tips to help your foundation last longer!


1. -  Start with a clean face, this will ensure your products glide on smoothly and your skin is clear of dirt and excess oils.

2. - Apply your moisturiser and leave it for 5 minutes to fully soak into your skin.  If after 5 minutes, you can still feel the moisturiser on your skin, then you are using the wrong formula and should opt for a lighter product.

If you have oily skin, choose a light-weight formula that will add hydration but reduce the appearance of oil and shine. For dry skin, use a rich, concentrated moisturiser that will add moisture back into your skin and help prevent flaking.

3. - Next step is to apply primer.  This product is made to help smoothen the surface of your skin to help any further products you use to glide on and stay on for long periods of time. A primer will act like a 'magnet' between your moisturiser and your foundation.

At the moment, I am loving Mary Kay Cosmetic's Foundation Primer (£14/29ml) but I also really like Benefit's Porefessional (£23.50/22ml) and Maybelline The Smoother Skin Retexturising Primer (£9.99/7ml).

4. - Once your primer has settled into the skin, apply your concealer and highlighter in the normal way. If you have heavy blemishes, you may need to apply additional layers of concealer on top of your foundation for a full coverage.

5. - Next step is to apply your foundation.  Do this in the way that is most comfortable for you, whether this is using your fingers, a sponge or brush.  Personally, I prefer to use a buffing brush as I feel this gives you a lovely airbrushed finish.

6. - Once you have applied your foundation, leave it to settle for 5 minutes.  Now I appreciate that not many people have loads of time in the morning, but if you want to help your make-up to last then it is important to allow your make-up to settle before applying the next layer. Perhaps you can use this time to do something else, like start getting dressed or have breakfast?  Personally I like to apply my foundation and then have my morning cup of tea.

7. - Once you have allowed your foundation to settle onto your skin, powder!! This is a very essential step if you have oily skin like I do.  Apply a layer of translucent powder onto your skin using a large powder brush, or try using a mineral powder foundation and buff into your skin using a buffing brush. This will set your foundation and help it to last.

8. - This step is optional, but beneficial if you have oily skin.  Keep a pack of oil blotters in your bag for touch ups throughout the day.  I say touch ups, but the blotting papers will gently remove the excess oil that sits on your skin and will leave a slight powder behind to help keep you looking matt throughout the day.

Now you should be set to stay looking pretty all day long!!

Enjoy my lovelies!!

Wednesday, 23 May 2012

Make Up Tip No.5 - How to make the most of your brows

All of us have them, but many of us forget that they need as much attention as our lashes or lips do when it comes to make-up.

When it comes to the shape of your brows, here is the general rule for shape.  Start by placing a make-up brush or pencil along the side of your nose, this is where your eyebrow should start.  Then turn it slightly so the brush/pencil is still resting on the edge of your nostril but is now running along the outside edge of the eye, this is where your eyebrow should end.  Finally, if you keep the brush/pencil at the edge of the nostril but this time run it through the iris of the eye, this is where the point of the arch of your eyebrow should be.

Image courtesy of http://www.beauty-advices.com


Once you have your eyebrows in the right shape, you should use make-up to define the brows. Now be aware I am not suggesting you have to colour your brows in like a clown, but just that with a light hand you can define the shape and colour of your brows to make them look perfect.

There are many different products that you can use for your brows, for example, pencils, powders and gels that can all be used to create the desired effect.  Whichever medium you choose, use light feathery strokes this will keep your brows looking natural.

Sunday, 20 May 2012

Make Up Tip No.4 - How to apply Mascara

Applying mascara doesnt have to be as tricky as it may seem, so here are a few tips to help you make the most of those beautiful lashes.

Make-up does go off, all products have an expiration period and you should be aware of this if you are keen to keep a healthy make-up bag, for more information on this, read about it here.

The average expiration period for mascara is 3 months, this is because the tube of the mascara acts as a breeding ground for bacteria.  You see we all have very tiny bacteria on our lashes and as you use your mascara it takes off some of this bacteria and distributes it into your mascara tube.  Now although this sounds gross, it is purely natural and nothing to worry about.  But the build up of bacteria in the mascara tube is exactly why you shouldn't keep your mascara for too long.  In addition to this, don't pump the mascara wand into the tube as this brings air into the tube and allows the bacteria to grow faster.

Image courtesy of www.bestbeauty-tips.com

Now enough of the technicalities, this tip is to help you apply mascara. When starting a new mascara you may find the wand holds a lot of excess product, to remove this simply scrape the wand across the opening of the tube as this allows the mascara to be kept for later applications and not wasted.

Once you have the right amount of product on the wand, you should rest the brush at the base of your lashes, it is best to start with your top lashes as these will need the most product on them.  Personally I find it easiest to have my eyes half open and looking down slightly as this will allow you to apply the product with minimal risk of it transferring onto your eyelid. Once you have positioned the mascara brush at the base of your lashes, gently wiggle the brush from side to side in a zig-zag motion moving away from your eye so you are applying the product to the full length of the lashes.  Once you have done this once, move along the lash line and start again.  Repeat this action until your lashes are completely coated in mascara, you may like to apply more than one coat depending on the look you are going for.

If you find your lashes are looking a bit clumpy, try using a clean mascara wand to comb through the lashes to separate as required.

I hope this is helpful and that you enjoy reading my tips as much as I enjoy writing them!

Friday, 4 May 2012

Quick Make-up Tips: Lips


Your lips contain very few oil glands & no sweat glands which means they don't produce the natural oils the rest of your skin does.

Your lips lose moisture 3 times faster than the skin on your cheeks. This is why it is very important to take care of your lips.

If your lips are feeling dry and cracked, try applying a layer of lip balm underneath your favourite colour. 

Tuesday, 1 May 2012

Quick Make-up Tips: Colour

Although we have now entered Spring, when the weather is still cold be careful your skin doesnt look blue or dull. 

To help avoid this, stay away from grey, brown and blue makeup tones and steer towards using peaches and pinks. Opt for slightly brighter shades and you'll look perfect. 

Saturday, 28 April 2012

Quick Make-up Tips: Lips


Try giving your lipstick shades a boost by combining lipstick with lip gloss!

This will add extra oomph to your pout for a great night out look.

Wednesday, 25 April 2012

Quick Make-up Tips: Cheeks


When picking a highlighter for your cheeks, choose a light champagne colour if you have fair to medium skin.  For darker skins, choose a pale gold shimmer.

Saturday, 21 April 2012

Quick Make-up Tips: Eyes


Apply white eye liner to the inner corners of the eye (& waterline) for instant brightening effects

Tuesday, 17 April 2012

Quick Make-up Tips: Lips

To add some extra volume to your lips, try using a high shimmer shade of lipgloss all over the lips. This will add dimension to the lips as the light bounces of the shimmer particles

Saturday, 14 April 2012

Make Up Tip No.3 - How to choose and apply the right concealer

Do you ever look at yourself in the mirror and think, where on earth did those bags come from? I know I do!

Whether it was a heavy night, not enough sleep or just natural shadows we all have those off days when our under eye shadows can really get us down. So rather than skulking back under the duvet, be proud of your skin and use some concealer to hide those under eye circles.

Image courtesy of http://www.hellomagazine.com

To begin with, don't get confused between colour correctors and concealers. Colour correcting products should be used to even out skin undertones and wont help to conceal blemishes and under eye circles.

When choosing your concealer, pick a colour that is closest to your foundation colour and skin tone.  The colour should exactly match your skin to give a flawless look. You should also consider the consistency when picking your concealer products, to cover blemishes opt for a creamier consistency whereas a more fluid formula is better for covering under eye circles.

To apply, use your ring finger (as it applies less pressure) and dab small dots of concealer along the under eye area and then gently press into the skin.  The skin around your eyes is so delicate you should not rub this area.

Apply concealer before your foundation, then apply foundation in the normal manner.  If required add a touch more concealer on top and then dust with translucent powder to set.

Happy Concealing my lovelies!!


Wednesday, 11 April 2012

Product Review: Model in a Bottle


Hello lovely followers,

I have recently discovered an amazing blog and website called makeupgeek.com, the main artist on there Marlena has some great tutorials and looks.

So while I was at work, I checked out a few of her video’s and a very interesting one was of her showing her followers what she packs for a Bridal Shoot.

http://www.makeupgeek.com/articles-reviews/how-to-pack-your-traincase-for-bridal-work/

In this video, there was one product that really jumped out at me, it was the Model In a Bottle: Make up setting spray.  I had never heard of this product before but as I have a couple of Wedding Make-ups booked, I was intrigued and just had to try it.

image
This item is made in the USA and as far as I could tell from a quick scan of the internet in my lunch break, there aren’t many places that sell this.  However, there are a few UK based sellers on Ebay that do!  So I managed to get my hands on a bottle for £16 (including free delivery) and it was at my door within 48 hours!  I couldn’t believe it!

So today, as part of my more dramatic work look, I finished it all off with a couple of sprays of this Model in a Bottle.  The packaging tells you to apply your make up as usual, wait for your mascara to dry.  Close your eyes and spray evenly 1-2 inches from your face and then wait 20-30 seconds for it to dry before opening your eyes.

I have to admit, I was sceptical I didn't think there could be anything that could keep my make-up on for the whole day!  Be warned, this isn't a miracle cure, your make up does still fade and run slightly but I don't think anything will ever stop that completely (but we can keep hoping).  But it does work!  For the first time in a long time I have actually returned from work and I still have a full face of make up on!

I’m prone to breakouts, especially on my chin, so usually by the time I come home I look like I went out with no make up on.  OK, so maybe I’m exaggerating a bit but I still look worse than when I went to work.  But today, I looked loads better! Hmm, maybe I’m not explaining this properly, today I came home with a full face of foundation still (a bit oily in the normal area’s but as I said its not a miracle cure), I still had colour on my cheeks and my eye shadow was in tact.

To summarize, this product is a hit!! At £16 for a bottle, that is said to hold 300 sprays I think this will become a permanent resident in my make up kit and on my shoots.

Thursday, 5 April 2012

Make Up Tip No.2 - How to choose the perfect foundation

Choosing the right shade of foundation is a very crucial part of your make up routine and it’s one that you can easily get very wrong - Which is why there are so many Oompa Loompa’s walking around nowadays (you all know exactly who I mean!)

Foundation should never be used to add a tan to your skin, but should be used to create a flawless base for the rest of your make up. Think of yourself as an artist and where you have to prepare your canvas before applying the paints.

The shade of foundation you choose should perfectly match your skin tone (not darker or lighter) an the tip to find this is to lightly apply the foundation along your jawline and see if it disappears when you blend it. You use the jawline because it is an area on your face that is least touched by blemishes. Now I know this may make you look a tad silly when you’re standing in the aisle of Boots but trust me it’s worth it when you can walk around with perfect looking skin.

It is also important to check the colour in natural light rather than artificial to make sure the colour is right for you!

Tuesday, 27 March 2012

Make Up Tip No.1 - For Longer Lasting foundation


image
A tip for longer lasting foundation:

We all want our foundation to last for the whole day, but it seems to slide off throughout the day.  It’s always good to moisturise before applying your foundation, but make sure you don’t apply too much.  In addition to this, try and leave your moisturiser for approximately half an hour before applying your foundation so that it has been absorbed into your skin and this will help your foundation to glide on smoother and last for longer.
Related Posts Plugin for WordPress, Blogger...